GB500guy
Well-known member
My 1975 XL250K2 build
A couple of my riding buddies have dual sports and do some combination pavement/dirt or gravel road rides. So I've been thinking that direction and in keeping with my interest in vintage bikes I decided to look for an XL250. I worked on many of them back in the day wrenching at a Honda shop, so they are familiar and I always found them to be an all around agreeable bike to work on and ride.
After looking at some real beaters on craigslist (supposedly in "great original condition", yeah right) I finally found a keeper, and 1975 K2 model with 8,600 miles showing on the odometer. It was not nearly as nice as it appears in these pictures but mostly appeared to need cosmetic and minor mechanical work. There were several small dents in the tank, minor rust on many parts, a couple of broken spokes, worn chain and sprockets, various minor oil leaks, and a couple of electrical bugs among other things. I paid a premium price but around here these old XL's sell high even in unrestorable condition, so I went ahead and paid market price for a decent one. Initially I wasn't sure how far I would go with it, whether to strip down to the frame and go all out or just do a 3/4 job. I started by fixing a few things and riding it a bit to get a feel for its condition.
Here is how she looked after purchase. Looks great at first glance, but like most 41 year old bikes it had many problems as I soon discovered.

So I rode the bike a bit and it seemed mechanically sound as I expected. I did some minor service like lubing cables, checking valve clearance, cam chain tension and timing, spoke tensioning, etc. then pulled engine covers for a better look inside. The bike ran fine and had great compression, and sounded good with no death rattles or other warning signs, so I assumed I'd be mostly dealing with cosmetics and fixing some oil leaks as far as the engine was concerned. So, eager to repaint the unique greenish-silver metallic engine side covers I pulled them off and discovered the cavity for the clutch actuating mechanism had severe corrosion. The Xl250 side covers are magnesium, and apparently magnesium does not like water! This is the plunger that pushes against the end of the clutch rod, and the hole in the case it rides in, totally corroded:

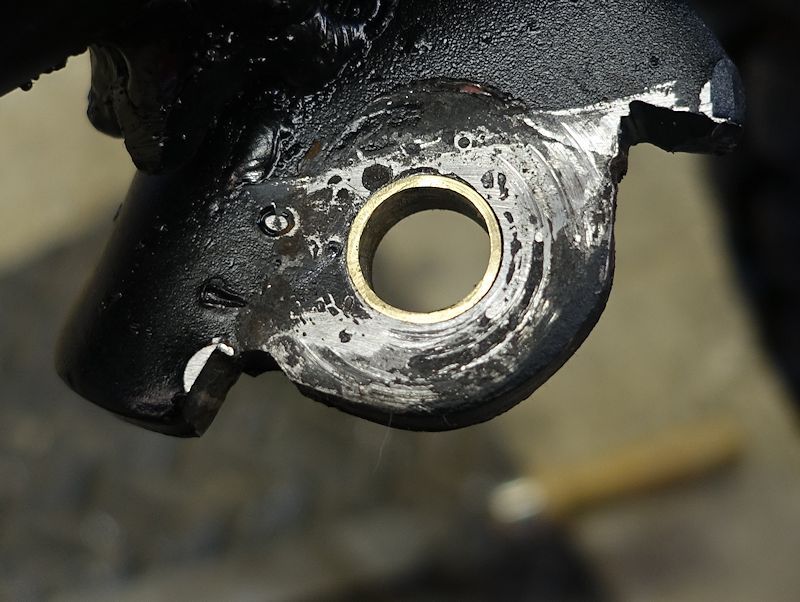
And the hole in the case that the clutch actuation shaft/lever rides in was totally corroded and worn badly oval. Here is the bottom end of the clutch actuation lever sitting in the corroded remains of its hole:

OK, no problem, this will make a fun little project! Fix this problem and I'll have this bike on the road in a week or two! (ha ha!) I'll make brass bushings and epoxy them in place to repair the damage. First step was to machine a Delrin bushing, press it into the case and use it as a drill guide to prepare the first hole for a brass bushing:

Then back to the lathe to make the bushing:

Then epoxy the bushing in place and one of the two problem holes is fixed:

To fit a brass bushing for the lower end of the clutch actuation lever I first needed to use a reamer to machine the corroded oval hole so the new bushing would be in the right position. Again I machined a Delrin bushing on the lathe, but this one needed to have three steps to fit the stepped hole in the case:

Then to hold the case vertically while reaming I clamped the case to a right angle fence:

Machined the second bushing and epoxied it in place:

And viola, the clutch lifter mechanism is repaired. The lever rides in a new needle bearing and seal at the top end, and the bottom end in a brass bushing. Both new bushings are drilled for passageways to the grease fitting on the case:

Here is the completed side cover, painted and with new needle bearing, seal, and clutch shaft to replace the corroded parts on the right. The original rubber cap for the adjustment hole is tough to find, so I just made one on the lathe from Delrin. I even found a brand new Honda grease fitting in my old parts bin.

That problem was solved, but the same corrosion that attacked the case also damaged the clutch push rod and the clutch rod oil seal. And on this bike you have to split the crankcases to replace the clutch rod seal (and the countershaft seal, which has a locating tab inside the cases):

I could just pull the lower crankcase off and replace the seals without disturbing the head and cylinder, but I figured I should at least pull the head cover and make sure the cam and rockers looked good. Uh oh, more problems! The intake rocker didn't look so good, and the cam lobes showed some pitting:

Also, using Plastigage the cam/head bearing journals measured out on the loose side at around 0.003":

Measuring the cam, it seemed most of the wear was in the cam and not the head bearings, so I went for a NO$ camshaft. I found a NOS intake rocker arm for cheap, and an almost new cam chain. OK, I'll get these parts installed and be on the trail soon!
Things were looking good, but a nagging thought told me that as long as I was this far into the engine I should at least pull the head and take a peek at the cylinder walls. Uh oh, again more problems! Apparently the bike had sat with water in the cylinder and there was too much pitting to ignore. So off came the cylinder. Should have expected this after seeing evidence of water damage in the carb float bowl:

So after scoring a .5mm over piston on eBay and sending the cylinder out for boring, I continued checking for problems. With fingers crossed I checked the connecting rod small end/wrist pin clearance. Using a feeler gauge cut from brass shim stock I found a new wrist pin had a snug .002" clearance. I'd rather have less, but this will work.

Back to splitting the crankcases, I took a good look at the transmission and found the 4th/5th gear shift fork had unacceptable wear:

OK, by now I was in too far in to turn back, so I ordered the shift fork and began working on theories to justify all the money I was pouring into this bike. But truthfully, the reason I bought the bike was that I needed a new shop project, and from that standpoint I've gotten my money's worth. Having the chance to revive a machine that I worked on in my younger days as a Honda mechanic was great fun. Hitting the trails could wait until the bike was really ready.
While waiting for engine parts and a cylinder bore I started cleaning, polishing and painting. Initially I assumed I would just touch up the frame paint but after buffing and clear coating nuts and bolts, removing rust and repainting every little bracket it was obvious the frame needed at least a complete repaint job. I probably should have sent it out for powder coating, but trying to keep to my mantra "It's a dirt bike, don't gold plate it" I compromised and glass bead blasted the frame and primed/sanded and enameled it with spray cans. I'm going for a mechanically sound machine and a cosmetically nice overall effect, not building a show bike, so here's my approach.
I used to do piano restoration and built this plywood glass bead blasting cabinet to refurbish large wood and metal piano parts. It's ideal for prepping any type of part for painting, and is big enough to hold the Xl250 frame. It has nylon windbreaker sleeves for the arm holes and is connected to a dust collector port to extract dust and create negative pressure inside to prevent harmful dust entering the shop (and my lungs!)


After blasting I applied rattle can black primer, sanded lightly, then put on three coats of black enamel. Here the paint is curing above the shop wood heater which also serves as a dog lounge on cold winter days.

-Bill
A couple of my riding buddies have dual sports and do some combination pavement/dirt or gravel road rides. So I've been thinking that direction and in keeping with my interest in vintage bikes I decided to look for an XL250. I worked on many of them back in the day wrenching at a Honda shop, so they are familiar and I always found them to be an all around agreeable bike to work on and ride.
After looking at some real beaters on craigslist (supposedly in "great original condition", yeah right) I finally found a keeper, and 1975 K2 model with 8,600 miles showing on the odometer. It was not nearly as nice as it appears in these pictures but mostly appeared to need cosmetic and minor mechanical work. There were several small dents in the tank, minor rust on many parts, a couple of broken spokes, worn chain and sprockets, various minor oil leaks, and a couple of electrical bugs among other things. I paid a premium price but around here these old XL's sell high even in unrestorable condition, so I went ahead and paid market price for a decent one. Initially I wasn't sure how far I would go with it, whether to strip down to the frame and go all out or just do a 3/4 job. I started by fixing a few things and riding it a bit to get a feel for its condition.
Here is how she looked after purchase. Looks great at first glance, but like most 41 year old bikes it had many problems as I soon discovered.
So I rode the bike a bit and it seemed mechanically sound as I expected. I did some minor service like lubing cables, checking valve clearance, cam chain tension and timing, spoke tensioning, etc. then pulled engine covers for a better look inside. The bike ran fine and had great compression, and sounded good with no death rattles or other warning signs, so I assumed I'd be mostly dealing with cosmetics and fixing some oil leaks as far as the engine was concerned. So, eager to repaint the unique greenish-silver metallic engine side covers I pulled them off and discovered the cavity for the clutch actuating mechanism had severe corrosion. The Xl250 side covers are magnesium, and apparently magnesium does not like water! This is the plunger that pushes against the end of the clutch rod, and the hole in the case it rides in, totally corroded:
And the hole in the case that the clutch actuation shaft/lever rides in was totally corroded and worn badly oval. Here is the bottom end of the clutch actuation lever sitting in the corroded remains of its hole:
OK, no problem, this will make a fun little project! Fix this problem and I'll have this bike on the road in a week or two! (ha ha!) I'll make brass bushings and epoxy them in place to repair the damage. First step was to machine a Delrin bushing, press it into the case and use it as a drill guide to prepare the first hole for a brass bushing:
Then back to the lathe to make the bushing:
Then epoxy the bushing in place and one of the two problem holes is fixed:
To fit a brass bushing for the lower end of the clutch actuation lever I first needed to use a reamer to machine the corroded oval hole so the new bushing would be in the right position. Again I machined a Delrin bushing on the lathe, but this one needed to have three steps to fit the stepped hole in the case:
Then to hold the case vertically while reaming I clamped the case to a right angle fence:
Machined the second bushing and epoxied it in place:
And viola, the clutch lifter mechanism is repaired. The lever rides in a new needle bearing and seal at the top end, and the bottom end in a brass bushing. Both new bushings are drilled for passageways to the grease fitting on the case:
Here is the completed side cover, painted and with new needle bearing, seal, and clutch shaft to replace the corroded parts on the right. The original rubber cap for the adjustment hole is tough to find, so I just made one on the lathe from Delrin. I even found a brand new Honda grease fitting in my old parts bin.
That problem was solved, but the same corrosion that attacked the case also damaged the clutch push rod and the clutch rod oil seal. And on this bike you have to split the crankcases to replace the clutch rod seal (and the countershaft seal, which has a locating tab inside the cases):
I could just pull the lower crankcase off and replace the seals without disturbing the head and cylinder, but I figured I should at least pull the head cover and make sure the cam and rockers looked good. Uh oh, more problems! The intake rocker didn't look so good, and the cam lobes showed some pitting:
Also, using Plastigage the cam/head bearing journals measured out on the loose side at around 0.003":
Measuring the cam, it seemed most of the wear was in the cam and not the head bearings, so I went for a NO$ camshaft. I found a NOS intake rocker arm for cheap, and an almost new cam chain. OK, I'll get these parts installed and be on the trail soon!
Things were looking good, but a nagging thought told me that as long as I was this far into the engine I should at least pull the head and take a peek at the cylinder walls. Uh oh, again more problems! Apparently the bike had sat with water in the cylinder and there was too much pitting to ignore. So off came the cylinder. Should have expected this after seeing evidence of water damage in the carb float bowl:
So after scoring a .5mm over piston on eBay and sending the cylinder out for boring, I continued checking for problems. With fingers crossed I checked the connecting rod small end/wrist pin clearance. Using a feeler gauge cut from brass shim stock I found a new wrist pin had a snug .002" clearance. I'd rather have less, but this will work.
Back to splitting the crankcases, I took a good look at the transmission and found the 4th/5th gear shift fork had unacceptable wear:
OK, by now I was in too far in to turn back, so I ordered the shift fork and began working on theories to justify all the money I was pouring into this bike. But truthfully, the reason I bought the bike was that I needed a new shop project, and from that standpoint I've gotten my money's worth. Having the chance to revive a machine that I worked on in my younger days as a Honda mechanic was great fun. Hitting the trails could wait until the bike was really ready.
While waiting for engine parts and a cylinder bore I started cleaning, polishing and painting. Initially I assumed I would just touch up the frame paint but after buffing and clear coating nuts and bolts, removing rust and repainting every little bracket it was obvious the frame needed at least a complete repaint job. I probably should have sent it out for powder coating, but trying to keep to my mantra "It's a dirt bike, don't gold plate it" I compromised and glass bead blasted the frame and primed/sanded and enameled it with spray cans. I'm going for a mechanically sound machine and a cosmetically nice overall effect, not building a show bike, so here's my approach.
I used to do piano restoration and built this plywood glass bead blasting cabinet to refurbish large wood and metal piano parts. It's ideal for prepping any type of part for painting, and is big enough to hold the Xl250 frame. It has nylon windbreaker sleeves for the arm holes and is connected to a dust collector port to extract dust and create negative pressure inside to prevent harmful dust entering the shop (and my lungs!)
After blasting I applied rattle can black primer, sanded lightly, then put on three coats of black enamel. Here the paint is curing above the shop wood heater which also serves as a dog lounge on cold winter days.
-Bill
Last edited: