You are using an out of date browser. It may not display this or other websites correctly.
You should upgrade or use an alternative browser.
You should upgrade or use an alternative browser.
RZ350 re-frame... classic 2-stroke gets modern upgrade
- Thread starter Frame Maker
- Start date
Frame Maker
Well-known member
extremely cool build. Really like the design on the shock placement. Very 70s style.
Thanks. Glad you like the build.:thumbup
Frame Maker
Well-known member
Part 4: building the prototype frame (continued)
Just to back track a bit, I found a few photos of the areas where I found very close fits or interference with the initial engine fitment...
 20200921_200128 by andbike, on Flickr
 20200921_200141 by andbike, on Flickr
 20200921_200439 by andbike, on Flickr
and then fixed...
 20200925_171431 by andbike, on Flickr
 20200925_171439 by andbike, on Flickr
Okay, moving on with the build... once back from CHP, brake and lamp inspections, and DMV, I now have the desired results in hand!
 20201013_130305 by andbike, on Flickr
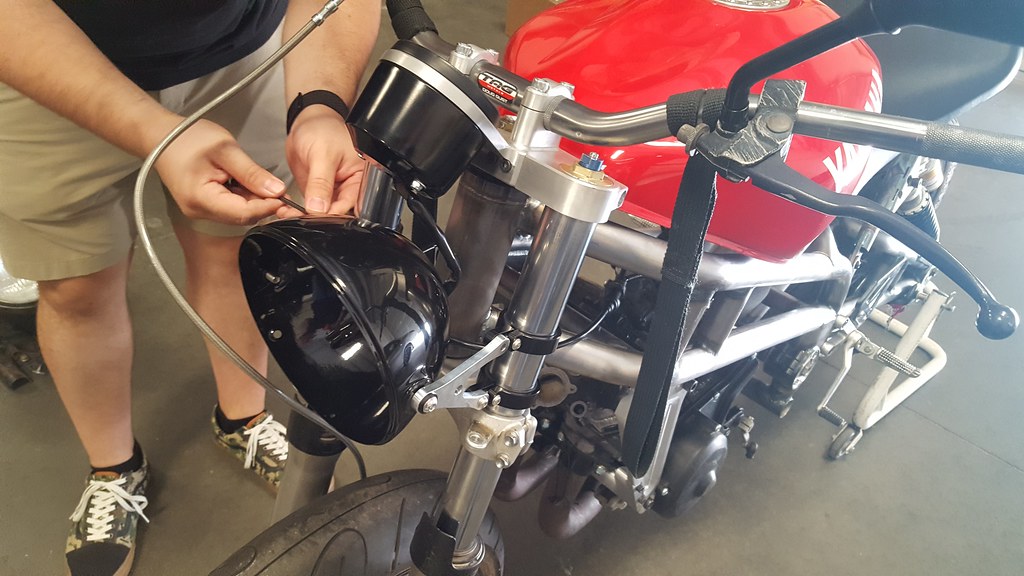
With this hurdle taken care of, I can move on with the lighting that I really want. First step is at the front. My good friend Brad Wood is owner of Motodemic in Tracy. His company is an authorized dealer for JW Speaker headlights. What Motodemic adds to this is their huge selection of custom mounting brackets to fit almost any bike. Most of the late summer I have been out of work due to C-19 and had offered to help Brad with some CAD work on a new project. In exchange he offers to hook me up with a super fancy LED headlight system, because $800 worth of headlight on a Dirtbag bike... hell ya! Thanks Brad:thumbup
By the way, please check out Motodemic if you do a lot of riding at night and want the absolute best headlight for your bike. Most of their kits are for sport standards (XSR700/900, Speed Triple, Monster, etc.) https://motodemic.com/
In the shop at Motodemic doing the install. Brad offers three different lengths of brackets, so a little bit of trial and error to find the length the fits best. I've also mounted my custom Chinese made CNC upper triple clamp with integrated tachometer holder. The mechanical tach is from an RD400 and works perfect with the RZ350 engine...
 20201006_121555 by andbike, on Flickr
 20201006_121614 by andbike, on Flickr
 20201006_124406 by andbike, on Flickr
Back in my own shop I can progress with the tail. I start by mounting a tail light I've found in a box of random parts. I'm not 100% sure, but I think the tail light is off a Ducati Multistrada. It probably came from Ed Milich's shop. He's my go-to guy for used Ducati parts. I've made many trips to his shop over the years and probably got him to throw in some extra tail lights on one of my trips. Anyway, the shape is perfect for how I want to build the tail...
 20201015_144502 by andbike, on Flickr
 20201015_144514 by andbike, on Flickr
 20201015_144528 by andbike, on Flickr
As mentioned previously, I need to build a utility rack to hold sleeping bag and camping tent. By this point in the build I'm pressed for time, so not as many in-progress pictures. So here's the rack finished...
 20201018_174601 by andbike, on Flickr
 20201018_174403 by andbike, on Flickr
This will wrap up the initial prototype construction, at least as far as I want to go for Dirtbag. Next up The 2020 Dirtbag Challenge!
Just to back track a bit, I found a few photos of the areas where I found very close fits or interference with the initial engine fitment...
20200921_200128 by andbike, on Flickr
20200921_200141 by andbike, on Flickr
20200921_200439 by andbike, on Flickrand then fixed...
20200925_171431 by andbike, on Flickr
20200925_171439 by andbike, on FlickrOkay, moving on with the build... once back from CHP, brake and lamp inspections, and DMV, I now have the desired results in hand!
20201013_130305 by andbike, on FlickrWith this hurdle taken care of, I can move on with the lighting that I really want. First step is at the front. My good friend Brad Wood is owner of Motodemic in Tracy. His company is an authorized dealer for JW Speaker headlights. What Motodemic adds to this is their huge selection of custom mounting brackets to fit almost any bike. Most of the late summer I have been out of work due to C-19 and had offered to help Brad with some CAD work on a new project. In exchange he offers to hook me up with a super fancy LED headlight system, because $800 worth of headlight on a Dirtbag bike... hell ya! Thanks Brad:thumbup
By the way, please check out Motodemic if you do a lot of riding at night and want the absolute best headlight for your bike. Most of their kits are for sport standards (XSR700/900, Speed Triple, Monster, etc.) https://motodemic.com/
In the shop at Motodemic doing the install. Brad offers three different lengths of brackets, so a little bit of trial and error to find the length the fits best. I've also mounted my custom Chinese made CNC upper triple clamp with integrated tachometer holder. The mechanical tach is from an RD400 and works perfect with the RZ350 engine...
20201006_121555 by andbike, on Flickr
20201006_121614 by andbike, on Flickr
20201006_124406 by andbike, on FlickrBack in my own shop I can progress with the tail. I start by mounting a tail light I've found in a box of random parts. I'm not 100% sure, but I think the tail light is off a Ducati Multistrada. It probably came from Ed Milich's shop. He's my go-to guy for used Ducati parts. I've made many trips to his shop over the years and probably got him to throw in some extra tail lights on one of my trips. Anyway, the shape is perfect for how I want to build the tail...
20201015_144502 by andbike, on Flickr
20201015_144514 by andbike, on Flickr
20201015_144528 by andbike, on FlickrAs mentioned previously, I need to build a utility rack to hold sleeping bag and camping tent. By this point in the build I'm pressed for time, so not as many in-progress pictures. So here's the rack finished...
20201018_174601 by andbike, on Flickr
20201018_174403 by andbike, on FlickrThis will wrap up the initial prototype construction, at least as far as I want to go for Dirtbag. Next up The 2020 Dirtbag Challenge!
Frame Maker
Well-known member
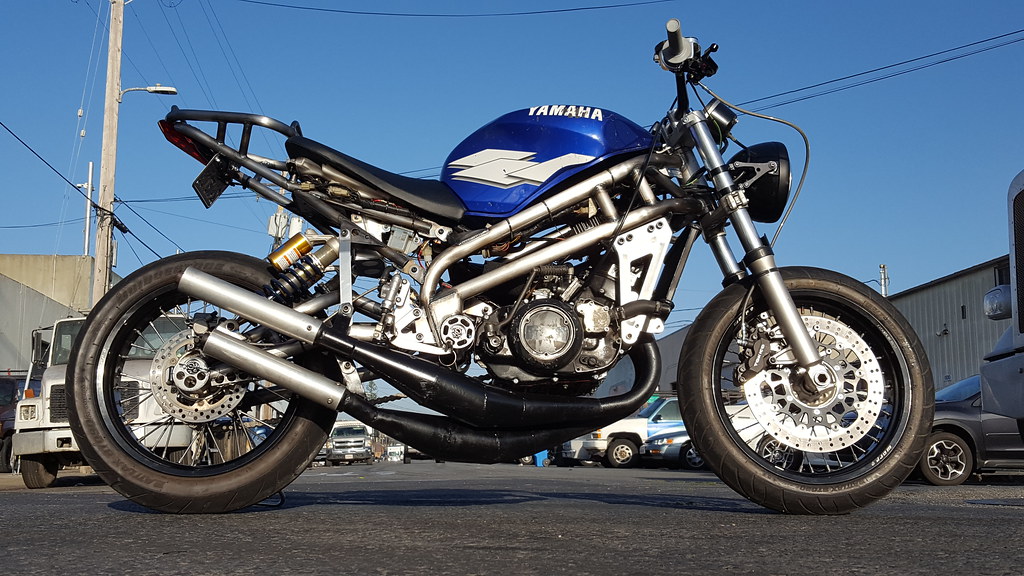
Part 5: The finished prototype and Dirtbag 2020!
Not much to say, except enjoy the pictures of the finished prototype...
 20201018_175003 by andbike, on Flickr
 20201018_174459 by andbike, on Flickr
 20201018_175022 by andbike, on Flickr
 20201018_174947 by andbike, on Flickr
 20201018_174905 by andbike, on Flickr
 20201018_174625 by andbike, on Flickr
 20201018_174532 by andbike, on Flickr
 20201018_174545 by andbike, on Flickr
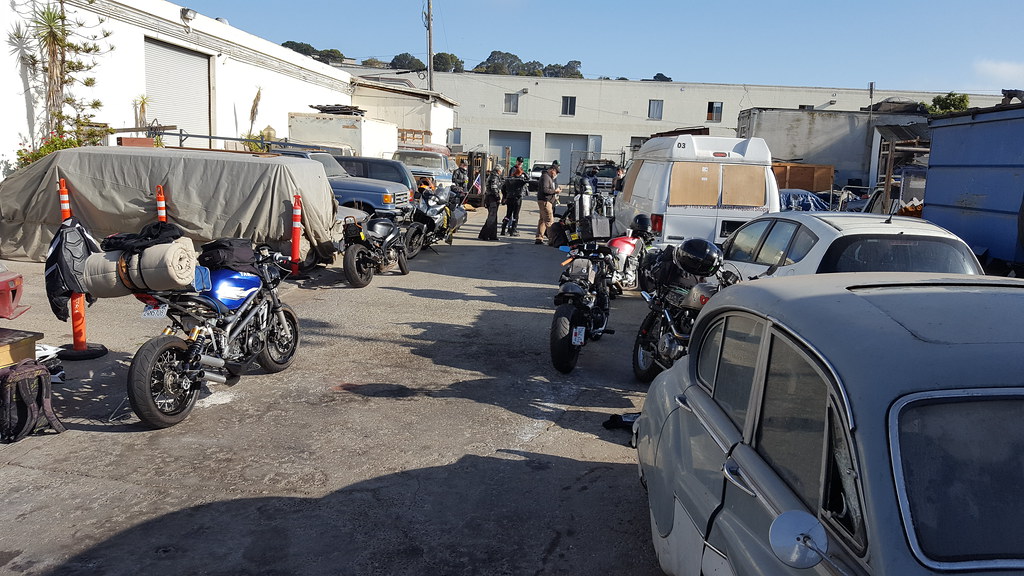
...and finally its Dirtbag Time!
Friday morning, end of Revere Street, SF... ready to go!
 20201023_085432 by andbike, on Flickr
some of the other Dirtbags beginning to arrive...
 20201023_101225 by andbike, on Flickr
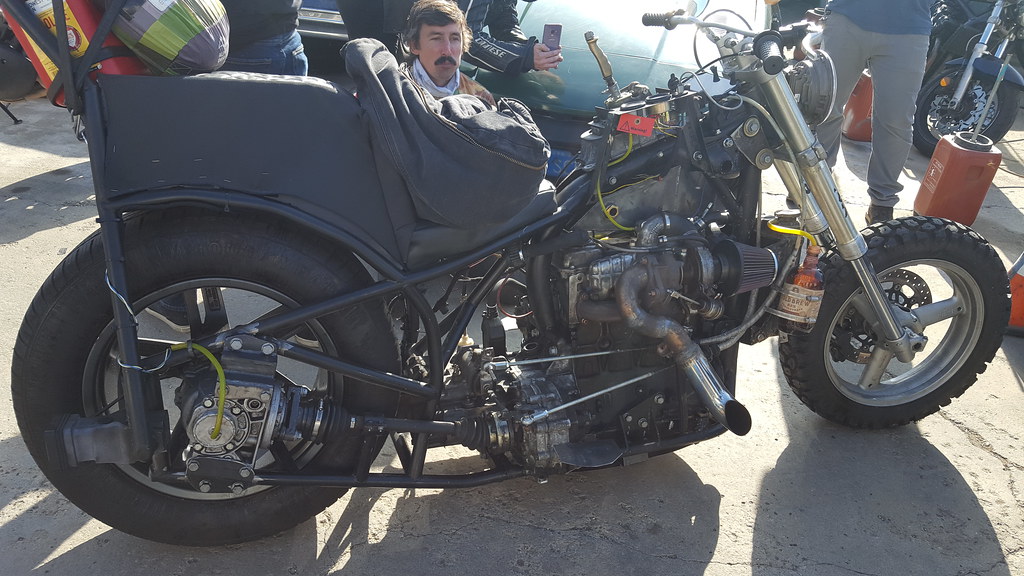
Turbo diesel VW Rabbit pick-up... turned Dirtbag bike!
 20201023_101413 by andbike, on Flickr
 20201023_101435 by andbike, on Flickr
Alan Lapp's 8 or 9 foot long Dirtbag trailer...
 20201023_101817 by andbike, on Flickr
 20201023_110450 by andbike, on Flickr
Day one would take us up hwy 101 then across hwy 37 into Sonoma, Napa, and eventually to Lakeport for Dinner. After Dinner we'd continue north to Upper Lake, then proceed up some very rough dirt fire roads into the Mendocino National Forest to our first campsite at Deer Valley. That fancy headlight was sure nice for this part of the trip which was ridden in the dark.
 20201023_093210 by andbike, on Flickr
 20201024_080122 by andbike, on Flickr
 20201024_082356 by andbike, on Flickr
Day 2 we would mostly be heading north west on Hwy 20 from Upper Lake to Fort Bragg on the coast. After a lunch stop in Fort Bragg we would head north, then 6 miles on a very washed out and rutted dirt road down to Usal Beach where we would camp for the night.
I have to say the the ride on Hwy 20 was the highlight of the trip for me. The road is super twisty through the redwoods with near perfect pavement. The bike handled perfectly! I couldn't be happier. The bike would flick side to side effortlessly (even with all the extra camping gear attached). Once leaned over, it would hold a line through the corners perfectly. There was nothing unpredictable or unbalanced about the way the bike handled. It was pure sport bike joy!
 20201024_090927 by andbike, on Flickr
We arrive at Usal Beach...
 20201024_161642 by andbike, on Flickr
 20201025_082207 by andbike, on Flickr
Not much to say, except enjoy the pictures of the finished prototype...
20201018_175003 by andbike, on Flickr
20201018_174459 by andbike, on Flickr
20201018_175022 by andbike, on Flickr
20201018_174947 by andbike, on Flickr
20201018_174905 by andbike, on Flickr
20201018_174625 by andbike, on Flickr
20201018_174532 by andbike, on Flickr
20201018_174545 by andbike, on Flickr...and finally its Dirtbag Time!
Friday morning, end of Revere Street, SF... ready to go!
20201023_085432 by andbike, on Flickrsome of the other Dirtbags beginning to arrive...
20201023_101225 by andbike, on FlickrTurbo diesel VW Rabbit pick-up... turned Dirtbag bike!
20201023_101413 by andbike, on Flickr
20201023_101435 by andbike, on FlickrAlan Lapp's 8 or 9 foot long Dirtbag trailer...
20201023_101817 by andbike, on Flickr
20201023_110450 by andbike, on FlickrDay one would take us up hwy 101 then across hwy 37 into Sonoma, Napa, and eventually to Lakeport for Dinner. After Dinner we'd continue north to Upper Lake, then proceed up some very rough dirt fire roads into the Mendocino National Forest to our first campsite at Deer Valley. That fancy headlight was sure nice for this part of the trip which was ridden in the dark.
20201023_093210 by andbike, on Flickr
20201024_080122 by andbike, on Flickr
20201024_082356 by andbike, on FlickrDay 2 we would mostly be heading north west on Hwy 20 from Upper Lake to Fort Bragg on the coast. After a lunch stop in Fort Bragg we would head north, then 6 miles on a very washed out and rutted dirt road down to Usal Beach where we would camp for the night.
I have to say the the ride on Hwy 20 was the highlight of the trip for me. The road is super twisty through the redwoods with near perfect pavement. The bike handled perfectly! I couldn't be happier. The bike would flick side to side effortlessly (even with all the extra camping gear attached). Once leaned over, it would hold a line through the corners perfectly. There was nothing unpredictable or unbalanced about the way the bike handled. It was pure sport bike joy!
20201024_090927 by andbike, on FlickrWe arrive at Usal Beach...
20201024_161642 by andbike, on Flickr
20201025_082207 by andbike, on Flickrmatty
Well-known member
I have to say the the ride on Hwy 20 was the highlight of the trip for me. The road is super twisty through the redwoods with near perfect pavement. The bike handled perfectly! I couldn't be happier. The bike would flick side to side effortlessly (even with all the extra camping gear attached). Once leaned over, it would hold a line through the corners perfectly. There was nothing unpredictable or unbalanced about the way the bike handled. It was pure sport bike joy!
That must've been so gratifying, knowing you got it right. Loving the pictures and write up.:thumbup
Frame Maker
Well-known member
Oh, and since Covid meant no DBC return 'n burn party, we'd have a more intimate party in the woods.
 20201024_171115 by andbike, on Flickr
 20201024_192018 by andbike, on Flickr
The Dirtbag Challenge has a very dedicated support crew that helps every year with planning and logistics. Because the party was 200+ miles north of San Francisco this year it meant that the crew had to drive food and sound equipment to the site. Many of these folks had 4x4 vehicles (including on person with a Unimog!). However, one young lady had very normal sedan. On the way in she cracked her oil pan open on one of the many deep ruts in the access road. Well, Dirtbags being what we are came of up with epoxy sticks, gasoline (to clean the damaged area), and scrounged some oil. I even donated some 2-stroke oil... because any oil is better than none! We were able to patch the car and she was able to drive out the next day with minimal oil leakage.
 20201025_113104 by andbike, on Flickr
Day three we would travel a little farther north on Hwy 1 then connect to Hwy 101 and head back to the Bay Area. In total we would cover almost 500 miles over the 3 days. On the the last day my bike would run very poorly for the ride home. The bike would idle okay, or run at highway speed okay, but no power in between. I would try adjusting the jetting at our lunch stop, but that didn't help. In the days following Dirtbag I would notice that the lower expansion chamber was badly smashed from the rough road in and out of Usal Beach. More on this in a later post.
Anyway, here are a few shots from the ride getting out of Usal Beach...
 20201025_122657 by andbike, on Flickr
One of few areas where the road was smooth...
 20201025_122708 by andbike, on Flickr
Justin Martens' turbo bike...
 20201025_122731 by andbike, on Flickr
 20201025_124000 by andbike, on Flickr
The turbo diesel VW bike would not make the dirt road so it was parked at the road-head and left overnight... because who's gonna steel it:dunno And to make the situation even more weird, someone left this random painting on his bike. Turns out the painting was left by friend of the builder... but neither knew the other would be in that area. Its was so strange... but so Dirtbag too.
 20201025_124144 by andbike, on Flickr
We all waited to make sure the girl with the Acura sedan made it out. She also shuttled Matt who is the builder of the Turbo VW bike, so more Dirtbag teamwork!
 20201025_124255 by andbike, on Flickr
All in all, a good time was had by everyone.
 20201025_130042 by andbike, on Flickr
Stay tuned. More updates to come.
20201024_171115 by andbike, on Flickr
20201024_192018 by andbike, on FlickrThe Dirtbag Challenge has a very dedicated support crew that helps every year with planning and logistics. Because the party was 200+ miles north of San Francisco this year it meant that the crew had to drive food and sound equipment to the site. Many of these folks had 4x4 vehicles (including on person with a Unimog!). However, one young lady had very normal sedan. On the way in she cracked her oil pan open on one of the many deep ruts in the access road. Well, Dirtbags being what we are came of up with epoxy sticks, gasoline (to clean the damaged area), and scrounged some oil. I even donated some 2-stroke oil... because any oil is better than none! We were able to patch the car and she was able to drive out the next day with minimal oil leakage.
20201025_113104 by andbike, on FlickrDay three we would travel a little farther north on Hwy 1 then connect to Hwy 101 and head back to the Bay Area. In total we would cover almost 500 miles over the 3 days. On the the last day my bike would run very poorly for the ride home. The bike would idle okay, or run at highway speed okay, but no power in between. I would try adjusting the jetting at our lunch stop, but that didn't help. In the days following Dirtbag I would notice that the lower expansion chamber was badly smashed from the rough road in and out of Usal Beach. More on this in a later post.
Anyway, here are a few shots from the ride getting out of Usal Beach...
20201025_122657 by andbike, on FlickrOne of few areas where the road was smooth...
20201025_122708 by andbike, on FlickrJustin Martens' turbo bike...
20201025_122731 by andbike, on Flickr
20201025_124000 by andbike, on FlickrThe turbo diesel VW bike would not make the dirt road so it was parked at the road-head and left overnight... because who's gonna steel it:dunno And to make the situation even more weird, someone left this random painting on his bike. Turns out the painting was left by friend of the builder... but neither knew the other would be in that area. Its was so strange... but so Dirtbag too.
20201025_124144 by andbike, on FlickrWe all waited to make sure the girl with the Acura sedan made it out. She also shuttled Matt who is the builder of the Turbo VW bike, so more Dirtbag teamwork!
20201025_124255 by andbike, on FlickrAll in all, a good time was had by everyone.
20201025_130042 by andbike, on FlickrStay tuned. More updates to come.
Last edited:
Frame Maker
Well-known member
That must've been so gratifying, knowing you got it right. Loving the pictures and write up.:thumbup
Glad you're enjoying the story ...and yes, extremely gratifying.:ride Thank you!
gixxerjeff
Dogs best friend
This is an amazing thread, Julian. Much respect for the work you do and you write about it in a very entertaining way.
You had a lot to do with the creation of this sub-forum. I am happy to see you making the most out of it.
I remember when newspaper's were a thing (yes, I'm that old. Fortunately you are too :laughing). From time to time my friends and I would compare notes on what order we read the paper. Some started with Sports, some started with County and others started with the front page.
When I log on to Barf I used to start off in General. Now, because of this thread I start out here. :thumbup
Frame Maker
Well-known member
Thanks Jeff. I much appreciate your enthusiasm for my project! But damn, knowing that this is the first thread you'll be checking every day kinda puts some new pressure on:thumbup I've almost caught up with 2 years of progress and will soon be at a point where updates are happening in real time and content will be much thinner then. I guess hoping others will start posting some build threads of their own (paging KPKE, MikeGyver, Cheez... who else?) arty
arty
artybikewanker
Well-known member
Tubularific!! I remember being fascinated with the AK-1s in City Bike and or RoadRacing World
Frame on.:thumbup
Frame on.:thumbup
kpke
Veteran
I guess hoping others will start posting some build threads of their own (paging KPKE, MikeGyver, Cheez... who else?)
Unfortunately my builds can't compete with yours and bergman's engineering wizardry. Mine are but a "garage hack" version of motorcycle builds (except for the stuff you have helped with :thumbup) so the interest level may be low. My machining tools fit in my hand or on a bench top :laughing I will try to get there soon. The photo fucket debacle means moving a billion photos from my PC to imgur to start the process. Because without pictures it didn't happen, you know?
Frame Maker
Well-known member
Unfortunately my builds can't compete with yours and bergman's engineering wizardry...
While I appreciate your generous compliment, its not a contest. You have some really cool projects (you can know your way around a polisher better than I do) that I think people would love to see:thumbup
...The photo fucket debacle means moving a billion photos from my PC to imgur to start the process. Because without pictures it didn't happen, you know?
What about your growing YouTube empire?
artyAnyway, I'd love to see you post up some "in progress" threads on your projects:teeth
gixxerjeff
Dogs best friend
I guess hoping others will start posting some build threads of their own (paging KPKE, MikeGyver, Cheez... who else?)
There is so much good material already loaded on to this sub-forum. It's somewhat of a new version of "The Best of Barf".
I'm just happy this corner of Barf is up and running. :thumbup
Frame Maker
Well-known member
Part 6: Post Dirtbag
In the weeks after Dirtbag I wanted to find out why it wasn't running properly on the last day. I also wanted to swap out the old crappy SpecII expansion chambers for a new set that my friend Brian Turfery had made. So that would be step one.
With the SpecII pipes off of the bike I could finally see that the GP styled cross over pipe (lowest point on the bike) had been badly smashed on the ride to and from Usal Beach. Did I mention that the road was severely rutted in some areas. I suspect that this was why the bike was running so oddly on the last day. Now on with the Turfrey pipes. The new pipes were designed specifically for an RZ350 chassis with a TZR250 3XV swingarm swap, which happens to be the same swingarm my frame is designed to use. Brian's pipes were a perfect fit and look amazing! But wait, how do they ride? The mid-range power is noticeably better. Much better! So much so that the bike is now slipping the clutch on hard acceleration. Turns out my clutch didn't have much free-play, but that wasn't an issue with the SpecII pipes. Now it is.
 20201029_091030 by andbike, on Flickr
I also wanted to get feedback from another rider. This is always a good idea for any new product... motorcycle or otherwise. As the designer I will always have some biases so wanted to get some sucker, uh, I mean my friend Ken to try the bike and get his opinion. Ken not only rode the bike, but documented his ride in this short YouTube video. Thanks ken! Oh, almost forgot to mention, Ken is KPKE here on BARF.
Here's his video...
https://www.youtube.com/watch?v=9nIu62JAmuc
As Ken mentions at the end of the video, the bike rides "different" than a stock RZ, is "stiffer" and "more upright". All are reactions that I would expect. It is more upright because I wanted it to be as comfortable as possible for my 500 mile Dirtbag ride. Because it uses GSXR forks, its very easy to convert back to clip-on bars for a more aggressive (less upright) riding position. As for stiffer suspension, well yes it is and that is mostly intentional. The bike is really designed as a high performance sport bike. It is set up rather stiff considering the GSXR forks on a bike much lighter than a GSXR and rear shocks that are now over damped for the lighter springs that have been installed. But all of this falls under normal suspension tuning that can happen later. So overall I'm happy with Ken's evaluation, especially that he had fun and wants to build one of these bikes for himself:thumbup
There is still engine tuning to be done as the jetting isn't as good as it could be (I think its still lean on the pilot and possibly rich on the main). I have lots of time to come back and fiddle with jets.
With the pipes swapped and the bike running well, the next step is to remove that fugly looking utility rack and build a proper rear sub-frame and race tail. About 30 minutes into building a fixture off of the old sub-frame my welder decides to die... WTF!!! I have a big "blue box" TIG welder and its been problem free for the past 25 years, so now it decides to die? Oh wait, 2020! Of course it decides to die now:x The sub-frame build will need to continue later...
In the weeks after Dirtbag I wanted to find out why it wasn't running properly on the last day. I also wanted to swap out the old crappy SpecII expansion chambers for a new set that my friend Brian Turfery had made. So that would be step one.
With the SpecII pipes off of the bike I could finally see that the GP styled cross over pipe (lowest point on the bike) had been badly smashed on the ride to and from Usal Beach. Did I mention that the road was severely rutted in some areas. I suspect that this was why the bike was running so oddly on the last day. Now on with the Turfrey pipes. The new pipes were designed specifically for an RZ350 chassis with a TZR250 3XV swingarm swap, which happens to be the same swingarm my frame is designed to use. Brian's pipes were a perfect fit and look amazing! But wait, how do they ride? The mid-range power is noticeably better. Much better! So much so that the bike is now slipping the clutch on hard acceleration. Turns out my clutch didn't have much free-play, but that wasn't an issue with the SpecII pipes. Now it is.
20201029_091030 by andbike, on FlickrI also wanted to get feedback from another rider. This is always a good idea for any new product... motorcycle or otherwise. As the designer I will always have some biases so wanted to get some sucker, uh, I mean my friend Ken to try the bike and get his opinion. Ken not only rode the bike, but documented his ride in this short YouTube video. Thanks ken! Oh, almost forgot to mention, Ken is KPKE here on BARF.
Here's his video...
https://www.youtube.com/watch?v=9nIu62JAmuc
As Ken mentions at the end of the video, the bike rides "different" than a stock RZ, is "stiffer" and "more upright". All are reactions that I would expect. It is more upright because I wanted it to be as comfortable as possible for my 500 mile Dirtbag ride. Because it uses GSXR forks, its very easy to convert back to clip-on bars for a more aggressive (less upright) riding position. As for stiffer suspension, well yes it is and that is mostly intentional. The bike is really designed as a high performance sport bike. It is set up rather stiff considering the GSXR forks on a bike much lighter than a GSXR and rear shocks that are now over damped for the lighter springs that have been installed. But all of this falls under normal suspension tuning that can happen later. So overall I'm happy with Ken's evaluation, especially that he had fun and wants to build one of these bikes for himself:thumbup
There is still engine tuning to be done as the jetting isn't as good as it could be (I think its still lean on the pilot and possibly rich on the main). I have lots of time to come back and fiddle with jets.
With the pipes swapped and the bike running well, the next step is to remove that fugly looking utility rack and build a proper rear sub-frame and race tail. About 30 minutes into building a fixture off of the old sub-frame my welder decides to die... WTF!!! I have a big "blue box" TIG welder and its been problem free for the past 25 years, so now it decides to die? Oh wait, 2020! Of course it decides to die now:x The sub-frame build will need to continue later...
Frame Maker
Well-known member
Part 7: major frame revisions
With the welder in the hospital for a few weeks, I'm back to CAD for some major revisions. I want to address the clearance issues that were discovered when I did the first engine fit test. I also want to make adjustment to the front engine mounting plates to allow a bit more access to the engine. The biggest change is to completely re-design the middle of the frame.
My Ak-1 frames were designed with a steel trellis main frame and aluminum mid-frame. On this project my original thinking was to eliminate the expensive CNC machined side plates and opt for a more economical design that could be made in steel. However, this direction resulted in many more pieces all which needed to be properly aligned and much more welding than I had anticipated. With more welding also comes more distortion. So I made the decision to go back to a design similar to the AK-1s with the aluminum mid-frame design.
A few benefits to the new design will be optimizing the design of the swingarm pivot inserts which I'll still be using. The purpose of the inserts is to allow for easy modification to fit different swingarm widths. This design also allows for easy modifications to fine tune the swingam pivot location. By swapping inserts, the swingarm can be moved up or down by a few milimeters if needed to fine tune squat/anti-squat characteristics. With the CNC side plates the foot peg mounts and rear sub-frame mounts are now integrated so those are no longer loose parts that need to be separately located and welded in place. On the front engine mount plates I move the rear edge forward to allow better engine access, so I've also moved the front edge forward to bring some strength back. I've also added some small bolt holes where I will add stand-offs and some very light weight side plates to better direct air through the radiator. Of course the CNC aluminum will also add some "bling factor" and that's always a good thingarty
Here's a look the amount of welding around the rear of the main frame including: frame gussets, s/a pivot cups, foot peg mounts, and rear sub-frame mounts (just out of view at top of photo)...
20201018_174625 by andbike, on Flickr
For reference, here's an AK-1 frame...
 DSCN1220 by andbike, on Flickr
Here are some screen images of the revised design with aluminum mid-frame...
 rz350 frame image 20210112.5 by andbike, on Flickr
 rz350 frame image 20210112.4 by andbike, on Flickr
 rz350 frame image 20210112.3 by andbike, on Flickr
 rz350 frame image 20210112.2 by andbike, on Flickr
 rz350 frame image 20210112.1 by andbike, on Flickr
Last week I sent out for 3D prints of the CNC plates. These will be used for fitment verification before I spend real money to get the CNC machined aluminum parts. I've also received the prognosis on the welder, so just waiting for it to be repaired. It should be ready sometime this week, then I can continue on the new rear sub-frame construction.
Well guess what boy and girls... this brings the build up to date. All future updates will now occur in real time as they happen (or very soon after). Thanks for tuning in, and as always stay tuned for more...
With the welder in the hospital for a few weeks, I'm back to CAD for some major revisions. I want to address the clearance issues that were discovered when I did the first engine fit test. I also want to make adjustment to the front engine mounting plates to allow a bit more access to the engine. The biggest change is to completely re-design the middle of the frame.
My Ak-1 frames were designed with a steel trellis main frame and aluminum mid-frame. On this project my original thinking was to eliminate the expensive CNC machined side plates and opt for a more economical design that could be made in steel. However, this direction resulted in many more pieces all which needed to be properly aligned and much more welding than I had anticipated. With more welding also comes more distortion. So I made the decision to go back to a design similar to the AK-1s with the aluminum mid-frame design.
A few benefits to the new design will be optimizing the design of the swingarm pivot inserts which I'll still be using. The purpose of the inserts is to allow for easy modification to fit different swingarm widths. This design also allows for easy modifications to fine tune the swingam pivot location. By swapping inserts, the swingarm can be moved up or down by a few milimeters if needed to fine tune squat/anti-squat characteristics. With the CNC side plates the foot peg mounts and rear sub-frame mounts are now integrated so those are no longer loose parts that need to be separately located and welded in place. On the front engine mount plates I move the rear edge forward to allow better engine access, so I've also moved the front edge forward to bring some strength back. I've also added some small bolt holes where I will add stand-offs and some very light weight side plates to better direct air through the radiator. Of course the CNC aluminum will also add some "bling factor" and that's always a good thing
artyHere's a look the amount of welding around the rear of the main frame including: frame gussets, s/a pivot cups, foot peg mounts, and rear sub-frame mounts (just out of view at top of photo)...
20201018_174625 by andbike, on FlickrFor reference, here's an AK-1 frame...
DSCN1220 by andbike, on FlickrHere are some screen images of the revised design with aluminum mid-frame...
rz350 frame image 20210112.5 by andbike, on Flickr
rz350 frame image 20210112.4 by andbike, on Flickr
rz350 frame image 20210112.3 by andbike, on Flickr
rz350 frame image 20210112.2 by andbike, on Flickr
rz350 frame image 20210112.1 by andbike, on FlickrLast week I sent out for 3D prints of the CNC plates. These will be used for fitment verification before I spend real money to get the CNC machined aluminum parts. I've also received the prognosis on the welder, so just waiting for it to be repaired. It should be ready sometime this week, then I can continue on the new rear sub-frame construction.
Well guess what boy and girls... this brings the build up to date. All future updates will now occur in real time as they happen (or very soon after). Thanks for tuning in, and as always stay tuned for more...
gixxerjeff
Dogs best friend
I'm looking forward to following this build in real time, Julian. opcorn
opcorngixxerjeff
Dogs best friend
I'm looking forward to following this thread in real time, Julian. opcorn
opcornFrame Maker
Well-known member
I'm looking forward to following this thread in real time, Julian.
:thumbup
This s a great post and thank you for showing us all of the details!
BTW, what 3d CAD program are you using?
Dan
Thanks Dan.
For CAD I'm using Solidworks. I have a very old seat, but its great for moto stuff.
bergmen
Well-known member
SolidWorks is the beez neez, good for you! I have just downloaded the latest version but have not had time to get into it. I have some experience with SW 2005 so it has been quite a while. Since that time I've used Creo (used to be Solid Designer) and before that ME30. We have recently transitioned to Siemens NX which is incredibly difficult for me to understand.:thumbup
Thanks Dan.
For CAD I'm using Solidworks. I have a very old seat, but its great for moto stuff.
Dan