Ducati 916 to streetfighter build (slowly)

I suppose it is time I provide some content to the BARFs since the BARFs has provided so much entertainment while bored at work. Follow along as I SLOWLY, and I do mean slowly, screw up my motorcycle and muddle my way through things I’ve never done before. Many of my acquaintances have asked why I waste my time building this bike, I like learning new things and I want a bike that is unique. My hope is that I can inspire people who may be thinking about modifying their bikes to make that leap and give it a shot. Everything I built or modified I’ve learned from the internet, self-taught, or by trial and error. My accounting degree doesn’t help at all with this :p

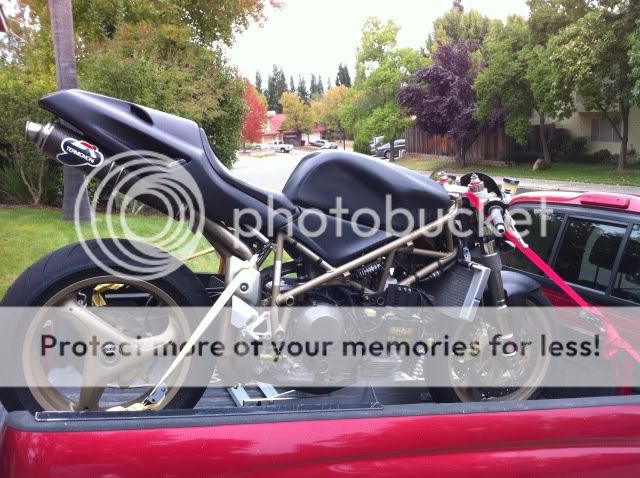
I picked up this 1998 Ducati 916 over 4 years ago, I’ve been working on it on and off ever since, and I am far from done so don't expect to see a pretty finished bike for awhile. There was an 18 month period where I gutted and renovated my garage and the Ducati was put in a body bag during that time. I picked the bike up in the Sonoma area. The original owner lowsided it and destroyed the fairings and headlight. The 2nd owner put on a dirtbike headlight and 996 forks and got it back on the street. He estimated the mileage to be about 4200. No worries, everything will be reworked or replaced.

Picture-1.jpg

IMG_0877.jpg

IMG_0880.jpg
 
Coming out of the body bag. I picked up some 5 spoke wheels since they are lighter and look much better. Also at this point I had a Monster clutch master and Hayabusa brake master since they had the integrated reservoirs.

Amazing how clean the garage looks in these pictures. Not so much now.
 

Attachments

  • Duc 1.jpg
    Duc 1.jpg
    69.1 KB · Views: 16
  • Duc 2.jpg
    Duc 2.jpg
    73.1 KB · Views: 23
Last edited:

IAmA M0t0r Ridεr

Well-known member
I like the idea! I was thinking about doing something like that with my Panigale, but don't have the nerve yet. Also haven't crashed yet. :)

I'd pick up a 916/999 too. Love the fat bars, and for me, I'd ride it like that! How much pretty do you want it to be? It's gonna be a challenge to clean up the engine much, because water cooled/fuel injected engines have a TON of wires and hoses all around.

Biggest challenge is to make a good tail for me. I hate the café racer hump, and since you already put the fat bars, I know you won't go in that direction.

I think you should finish the front end first, then figure out what can be done with the tail for last.

I'm not a big fan of cutting the frame and just leaving the seat hanging in the air, it can work, but if not, then it's too late...

Subscribed!
 
The stock 916 seat sucks. I had a 2003 SV650 that had an aftermarket gel seat that I absolutely loved. I saved the seat when I sold it. After looking at other seats online that were supposed to be the same I realized my seat had been modified at some point by somebody who knew what they were doing since mine was significantly thinner than others. I have only seen 1 other that looked the same and that owner said they bought the bike with the seat and didn’t know it had been modified. Point is that I’ll be using the SV seat and move it 3.5” closer to the bars to reduce some of the forward lean of the rider. Even with the higher bars and the closer seat it still has a somewhat forward riding position.

But how do you move a seat forward? Make your own fuel tank. I’ve never done anything like this before, but set out the only way I could think of. Some floral foam should sculpt nicely, right? The crap foam glue they sell at the craft store didn’t do squat. Hot glue did the obvious, melted the foam. The expanding foam in-a-can ended up working great to glue the pieces together.
 

Attachments

  • Duc 3.jpg
    Duc 3.jpg
    68.6 KB · Views: 13
  • Duc 4.jpg
    Duc 4.jpg
    76.8 KB · Views: 15
Last edited:
IAmA M0t0r Ridεr;9044506 said:
How much pretty do you want it to be?


Very pretty!

IAmA M0t0r Ridεr;9044506 said:
It's gonna be a challenge to clean up the engine much, because water cooled/fuel injected engines have a TON of wires and hoses all around.

You are right, but I have some ideas to clean it up some.
 
I originally tried to make my own hot wire to cut the foam, but that failed miserably. I ended up useing a serrated bread knife to hack off large amounts of foam and this rasp to sand the foam down.
http://www.harborfreight.com/10-inch-two-way-combination-rasp-plane-66620.html
They worked great!

I should mention that I have zero artistic ability. I can’t draw, paint, or sculpt to save my life. I printed out some concept bikes for reference and kinda hacked away until I liked one side. The more I tried to make it look good the worse it got.
 

Attachments

  • Duc 5.jpg
    Duc 5.jpg
    80.9 KB · Views: 14
  • Duc 6.jpg
    Duc 6.jpg
    80.4 KB · Views: 12
  • Duc 7.jpg
    Duc 7.jpg
    72.6 KB · Views: 12
Started on the tail. Same thing, glued foam together, maybe a little too much
 

Attachments

  • Duc 11.jpg
    Duc 11.jpg
    72.8 KB · Views: 12
  • Duc 10.jpg
    Duc 10.jpg
    79 KB · Views: 11
  • Duc 9.jpg
    Duc 9.jpg
    69.6 KB · Views: 10
My original idea was to integrate the muffler into the tail, but I realized the volume of the tail would need to be much larger so I abandoned that idea. The stock oval cans were replaced with some 848 cans. I also cut and booger welded the aluminum subframe to allow the tail to sit over it.
 

Attachments

  • Duc 12.jpg
    Duc 12.jpg
    83.3 KB · Views: 12
  • Duc 13.jpg
    Duc 13.jpg
    75.3 KB · Views: 12
(Warning, I jump around a lot)

The airbox works fine as it is, but that’s boring, so let’s modify it. I cut the large hump off the back since is seems to serve no purpose. There is nothing under it and the Ducati race bikes had a much much larger airbox so more is better, right?
 

Attachments

  • Duc 14.jpg
    Duc 14.jpg
    69.8 KB · Views: 11
  • Duc 15.jpg
    Duc 15.jpg
    62.6 KB · Views: 11
  • Duc 16.jpg
    Duc 16.jpg
    78 KB · Views: 11
The bottom of the tank serves as the top of the airbox. I did a splash mold of the bottom of the stock tank with fiberglass to be used on the bottom of the foam tank.

I guess I should point out the foam tank will be the plug for a mold to make a carbon fiber tank. Much the way tygaboy did on BARFs years ago.
 

Attachments

  • Duc 19.jpg
    Duc 19.jpg
    61.1 KB · Views: 11
  • Duc 18.jpg
    Duc 18.jpg
    80.3 KB · Views: 12
  • Duc 17.jpg
    Duc 17.jpg
    106.6 KB · Views: 10
First coat of body filler on the tank. I used Rage filler, really good stuff. Sands easily unlike the Bondo concrete.
 

Attachments

  • Duc 20.jpg
    Duc 20.jpg
    58.5 KB · Views: 11
  • Duc 21.jpg
    Duc 21.jpg
    57.2 KB · Views: 12
I whittled away for months at the tail. Adding foam, cutting it off, adding foam, cutting it off. I ended up with this fuglyness.
 

Attachments

  • Duc 22.jpg
    Duc 22.jpg
    65.6 KB · Views: 11
Started fresh and came up with something I liked. The first layer of filler looks rough since all the foam crumbs mix in when it is spread.
 

Attachments

  • Duc 27.jpg
    Duc 27.jpg
    65.3 KB · Views: 10
  • Duc 26.jpg
    Duc 26.jpg
    55.1 KB · Views: 12
  • Duc 25.jpg
    Duc 25.jpg
    49.4 KB · Views: 12
  • Duc 24.jpg
    Duc 24.jpg
    52 KB · Views: 13
  • Duc 23.jpg
    Duc 23.jpg
    65 KB · Views: 14
Sand and fill, sand and fill. I took a belt sander to the tail at one point because one section was off quite a bit. I was finally happy with it so on to primer.
 

Attachments

  • Duc 28.jpg
    Duc 28.jpg
    62.2 KB · Views: 13
  • Duc 29.jpg
    Duc 29.jpg
    65.1 KB · Views: 12

IAmA M0t0r Ridεr

Well-known member
I don't know man. I can't see past the ugly foam. Maybe you should ask help from an artist? :) But hey, I'm not an artist too.

Have you thought about the 999 tank?
 
Getting the tank symmetrical was very difficult. I ended up cutting shapes out of paper to match each section of the tank. I taped them together and then turned the whole thing inside out to lay on the other side to transfer the shapes. I would venture to guess I had at least 150 hours into the tank up till and after this point. I thought I was close to done when I happened to look at the tank head on while it was sitting on my workbench one day. It was so far out of symmetry I couldn’t believe it. I thought I was close enough, but I was so far from done. I knew failure would be par for the course, but this was a big one. At this point I took a few months off to regroup and weigh my options.
 

Attachments

  • Duc 30.jpg
    Duc 30.jpg
    42.7 KB · Views: 9
  • Duc 31.jpg
    Duc 31.jpg
    44.6 KB · Views: 9
Last edited:
Top